skip to main |
skip to sidebar
 The rebuild couldn't start early yesterday, because I needed a part. To be precise, I needed a Lower Frame Cone Cover. A small piece of pressed steel which goes between the Frame and the Frame cone... It costs £2.50, and I didn't have one. Anyway, a few phone calls later and I was heading over to Preston to buy the aforementioned article from Frank Sanderson at Lambretta Innovations. And what a nice chap Frank is... He showed me round his workshop and I saw some really excellent Lambretta conversions going on. He is a superstar in the scoo
 tering world, but he is a down to earth bloke like the rest of us - a real unassuming northerner, and a top bloke. My next scooter may well be one of Frank's wonderful creations.
So, part in hand, I returned home to begin the rebuild. Only I couldn't... I had to Waxoyl and Stone Chip Guard the area behind the rear numberplate, and that involves taking the scooter outside to spray it - As it was bloody freezing yesterday, I decided to do the spraying in the nice warm kitchen, on account of the paint needing to be warm enough, you understand. So I set up a makeshift spraybooth using an old sheet and the maiden, masked off the bits I didn't want spraying and proceeded to apply liberally. I think I got away with it!
 According to Sticky, the chassis rebuild has to go in a certain order, and I'm not about to argue, so I proceeded to fit the rear mudguard and the stand. The rear mudgard needed a new hole drilling, as the original one was about 20mm away from where it should be, and the stand was a real pain to fit because o
 f the bloody spring. After much jiggling and on and offing, I eventually got the stand and the spring fitted, using a combination of brute force and the stand bolt to drag the stand in line. Then I remembered that I'd bought a stainless steel splash plate, so the whole thing had to come off and go back on again. Such is life!
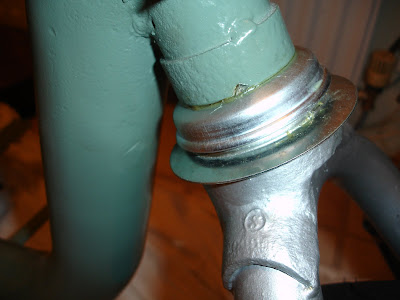
Forks went in next, and these were really easy to do. Loads of grease, bearings, tab washers and bolts, and in it went. It looks really well, and the scooter is finally starting to have a feel of a scooter, rather than a load of components now!
OK... Some of you have been waiting for this, so I will finally reveal the theme for the scooter. Originally, I was going to do a 'Pressure Drop' themed scooter, after the excellent song by Toots and the Maytals, but I have seen a few scooters of the same name knocking around, so I decided against that one.
So that set me thinking... What shall I do with mine. A couple of days to go before the respray, I was wracking my brains wondering what to do when it hit me. I'll do a scooter based on an MA1 flight jacket - The ones which many scooterists (not mods) wear. And not just any MA1... The king of all flight jackets, Alpha Industries!
The colour I chose was a sage green colour specified for Skodas in the 70's and 80's which matched the colour of olive green used in Flight Jackets quite well. The thing about MA1's is that they have a reversible lining which is bright orange, so that a downed pilot can put the jacket on inside out to be more easily seen in an emergency. So all the scooter internals (the petrol tank, Airbox, airbox bellows and the toolbox) are painted in Ford Focus ST orange.
I have other plans for the scooter too; It's not just the colourway I have chosen... These will be revealed as I do them. So you'll want to see a photo now, I guess... Thanks for your patience.

Back from Bridlington and looking at a week off work, so I thought it was about time I did something with the GP... I got the front upper and lower bearing races two weeks ago, and they have been in the freezer since (note to self; don't put on tongue), and I picked up a pair of silent blocks plus a Mark Broadhurst rear wheel race bearing and a copper exhaust gasket from the parts fair in Brid, so we're good to go. On the subject of the parts fair, why do we get charged a fiver to go in to spend? It's wrong that we have to stump up this money... I don't mind a couple of quid, but a fiver? Come on! ) OK... End of rant.
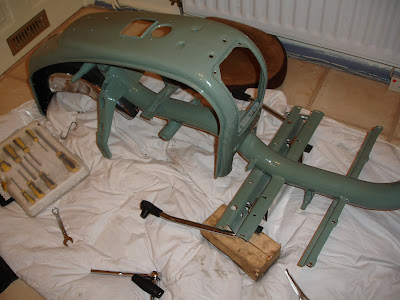
Anyhow... The good news is that because of my lack of workshop, Carol has agreed to let me start the build in the kitchen, where the dining table used to be... What a result. A warm, light environment with clean floors and easy access to brews in which to put the scoot back together... It can't get better than that! I'm off to move the dining room table now, and get the frame prepped for the rebuild. May even post some pictures later today to show how much I've done...
The alchemy that is Mechanicking is a real dark art to me. Don't get me wrong, I can get by with a Haynes Manual (or Sticky's book, in this case) and do basic maintenance, but when it comes to a full strip and rebuild, I would prefer to leave that to people who know what they are doing.
This is why I have just dropped my engine off at Jonsey's. Jonsey (or Grim as he is sometimes known) has been around Lambrettas for years. He is also in our club, and I knew him back in the day when we were kids too. He watched me take a hacksaw to my SX200 frame in Karl Parkinson's garage, and I recall him shaking his head sadly at my actions. Jonsey also still has every scooter he has ever owned, stored neatly in boxes in his Uncle's Loft. And I saw his garage, which some refer to as the El Dorado of the Scootering World... Original bits and bobs from allsorts of scooters are lying on shelves, or are stacked in nooks and crannies everywhere.
I had to ask Grim to take it easy on my engine... He is notorious for building things which shouldn't be built, so I told him to give mine a slight tune, but nothing which involved the removal of load bearing and or structural parts of the engine... I want a reliable scooter, not one which goes really quick until it goes bang. I want to be able to travel to Kelso or the Isle of Wight safe in the knowledge that I will arrive there and be able to get back again. A rare dream, I know, but one I am used to on the Vespa...
So, a few hundred quid lighter I gave the engine to Grim with a bag of bearings, seals, clips, tabs, washers etc. We'll see what comes back!
The scoot is now back from the sprayers and I think the colours work really well for the theme I have planned. I'm not posting any pictures yet, because that will give the game away, but I love the way it's looking.
Chris Timmins did my spraying... He's the guy who did Ady's Lambretta (the Factory Records LI which Ady managed to plough the Southport Road with... Nice Job, Ady!) and he did an excellent job of Ady's scooter and he's really cheap. So I thought I'd give him a go for mine. Turns out he used to live next door to me when I was a kid... One of those wierd coincidences that life sometimes throws up.
Anyhoo... Colours were applied (colours, as in plural) and he did an even better job of mine than he did with Ady's (in my opinion). There were a couple of bits on the headset bottom where the paint was a bit light and some primer showed through, but that was due to Chris not knowing Lammys - He sprayed it upside down and the recess for the steering lock and a couple of small points where the gear indicator is weren't covered properly still showed the primer. I pointed this out and he sorted it immediately, which was excellent... He also went above and beyond on the frame, as after it was done, I asked for the small rivet holes where the Indian chassis plate used to be (above the bridge piece) to be filled. And it only cost me £320 including the prep, paint and everything! A real result! Anyhow, if anyone wants a Lammy doing, I would recommend him. A good painter who does a really good job at a reasonable price! Drop me a mail and I'll pass on his mobile...
 Now I have the new legshields, I can take the opportunity of fitting some of those tricky items which will damage the paintwork if (or more likely, when) I get it wrong. Ady said one of the most tricky jobs was fitting the stainless steel floor runners to the legshields, especially round the curve. So I figured I would give mine a dry fit before the paint went on. And I'm glad I did. The runners are well made, but they take a lot of jiggling (and therefore scratching) to get on. A few taps with a hammer and a screwdriver finally got the last runner in place, though... I like the way they look, however... Very special.
While damaging the legshields was on the cards, I decided to drill the holes for my fraudulent badges. The scooter is an Indian Vijay 150 Super, but I am putting Lambretta GP150 badges on it... How wrong is that? Like labelling Rola Cola as Coke... Anyway, it's my scooter, so I'm doing it. I have been taking loads of reference photographs of GP's to get the positioning of the badges right... Most of the GP's I have seen are Indian in origin anyway (there are a few telltale signs to spot 'em... It's a fun way to spend an afternoon on a rally, Indian spotting... I bored Carol senseless with that game at Cleethorpes). Anyway, I took an average of where other people put theirs and drilled the holes... I like it, anyway. I'm sure some anorak will tell me that they are in the wrong place, but it's an Indian GP... As far as I'm concerned, they look good where they are!
 Those of you who have done a few rebuilds will have undoubtedly used the words in the title of the post before... 'It doesn't fit' seems too echo from every forum in the scootering world. Now it's my turn to use the phrase.
I offered up the toolbox to the new legshield, and from above, it looks spot on... The PX toolbox was from ScootRS, and it has been shaped to fit a GP legshield.
Unfortunately, the person who shaped the toolbox has obviously never even seen a GP legshield in his (or her) life, before... I would need to t ake a bus between the legshield and the edge of the toolbox! It is a shame, because everything else I have got from the company looks to be of good quality... Plan B needs to come into action as soon as possible... Plan B is to put the PX toolbox on e-bay and see how much I can get for it... By the time I have trimmed the toolbox so that there is a nice, equal gap all around the edge, and I have ground off and repositioned the anchors inside the box, I may be able to fit a tissue inside. So it really is not worth having. So off it goes. *End of rant*

 tering world, but he is a down to earth bloke like the rest of us - a real unassuming northerner, and a top bloke. My next scooter may well be one of Frank's wonderful creations.
 f the bloody spring. After much jiggling and on and offing, I eventually got the stand and the spring fitted, using a combination of brute force and the stand bolt to drag the stand in line. Then I remembered that I'd bought a stainless steel splash plate, so the whole thing had to come off and go back on again. Such is life!


