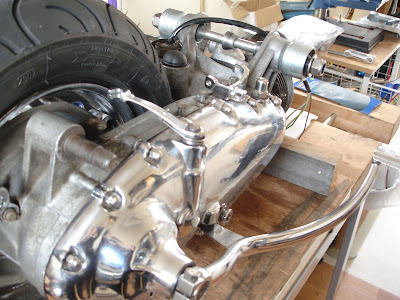
The second anniversary of me getting the Lambretta is getting close. I had in my head that it would be all finished by now, but sadly , it isn't. So, what else have I done?
I needed to get the fuel tank, the airbox and the toolbox in, so that was the next job. A load of fiddling to make sure I didn't scratch that lovely orange paint, but it was all relatively straightforward. And it looks excellent.
I need to fit the legshields and the mudguard and the horn casting. And get all of the rubber bits of trim in the right places, so off I went. The paint work suffered a few scratches while trying to get the leggies in, which I was very pissed off about. I even masked up all the points of contact, so that this could be avoided, but the leggies just ploughed the paint. Very annoying, but it's only a scooter...
Legshields in, I fitted the stainless runners prior to the mudguard and horncasting ... Just can't wait! The reason for fitting this trim first is that some of the bolts for the runners hold on the mudguard. But other bolts need to sit under the trim, so it all gets a bit confusing. Oh, and I put in those little rubber anti-vibration thingies too... How fiddly are those? I put the legshield trim on too. The original polished legshield trim clasp I bought shattered, so a quick trip up to Scootlife, and I had a new (and better) set in my hands.
Mudguard and horncasting, next, and what a pain in the arse those were. You have really limited access to get to things, so I had to enlist Carol and her unfeasably small hands to do up some of the nuts. And taht trim for the horncasting just wouldn't stay put at all. You'd do one side, then the other would pop out (or pop in). That was very annoying. But, it's all finally in and looking absolutely sweet! It looks like a scooter now.
Tuesday, 14 April 2009
Sunday, 12 April 2009
April stuff... Busy busy busy!
Went to New York again with work, which was nice. It's a beautiful city, and I was on the lookout for a New York numberplate for my workshop. Sadly, I didn't get one as I felt that an arrest for stealing a vehicle part would be detrimental to my career.
The Easter Break is a very productive time... Did a few small bits to the engine, like fitted the new side casing and a few internal bits, like the kickstart bumpstop, kickstart oild seal, etc. and loosely fitted the casing to the engine. Still a few bits in there to sort out, so it's pointless ratcheting it all up. And while I had the engine nearly done, I decided to fit it in the scooter. This was a tricky job, as I was on my own for pretty much all of it. I have a small car jack and a couple of axle stands, so a bit of jimmying and a few swearwords later, it was in! And it looks really good, too. Also fitted the toolbox door, which required a bit of fabrication to get a decent hinge mechanism. Speaking of hinges, I need to fettle that petrol flap, too...
That rear bulb holder turned into a bigger job. It ended up costing me £22 for a decent bulb unit, which I then butchered to put into the alloy unit fitted on the scooter. It is a bit annoying, but I want the thing to be right, so it needs to be done. I got the rear bulb holder from Pete Merchant's shop over in Rochdale. While there, I had a chat with the famous Harry Barlow. He is doing Ange's engine for her and so we are in a bit of a biker build off. He is a top bloke, and one of the nicest guys you will ever meet, so I quite enjoyed going over and having a chat. Got a few bits from the nice people at Lambretta Cottage Restorations while on my travels. I thoroughly recommend these nice Yorkshire folk - Very knowledgeable and they will tell you which bits are shit and which aren't, even if they sell them! Not everyone is like that, I can tell you!
Gave the workshop a coat of paint, too, while dodging the rain, and sealed off the edges of the roof, so it's now nice and watertight.
Tuesday, 17 March 2009
Little jobs
There are a few little jobs that need sorting on the scooter, so I'm going to spend a bit of time doing those to ease myself back in to the rebuild. Things like changing the rear bulb holder on the new back light unit (because the one that's on looks as though it is made of cheese), polishing the brake pedal (because, despite hints, it doesn't look like I'm about to get a new billet pedal with matching kickstart) and allsorts of little niggly things which aren't expensive to sort but all take time.
So, typing this ain't getting no stuff done...
Monday, 16 March 2009
I have light, now for the heat!
My brother gave me a wood burning stove, and he came over yesterday to help me to fit it. I cleaned the stove thoroughly (wearing out 3 wire brush attachments in the process), to get it back to bare metalIt took about 15 hours to get it all done, as it was quite rusty in some places. And Cath at work supplied the chimney... Well, her dad did. Thanks for that, Cath's dad!
So, we cut a big hole in the roof, installed a collar (meant for barges, incidentally), manhandled the stove into position, then put the chimney in. A load of fire cement later, and we were ready for the test... Fired up the stove, and the job, as they say, is a good one!
The shot shows the back of my workshop, while the other shot below shows the front (the door end). The final shot is the window wall which contains my workbenches and drill station.
So what do you think? I like it, and it is light, warm (or hot, most of the time) and it even has a disco ball in the middle of the ceiling!
Sunday, 15 March 2009
More workshop details
The workshop is wired for Electricity, courtesy of Ady who pulled a blinder getting it all wired and correct. Cheers, mate!
I wanted to have loads of sockets and light in there, so I have got fourteen sockets, three flourescent tubes, plus a couple of tasklights and an external security light on there too. One of the tubes is set on the back wall, at waist level, so that any project can be viewed without difficulty on the turntable.
... I didn't mention the turntable, did I? As part of the deal for letting me work in the kitchen over the winter, Carol wanted a new dining room table, so being a cheapskate (and a bit skint), I re-used the old table to make a turntable. I routed out a groove on the floor, put a corresponding groove on the underside of the table, and filled the resulting channel with greased marbles... Hey presto! One turntable. Scooter goes in, work, work, work, turn and scooter goes out! The turntable has a retaining pin for safety, and this can be locked off at every quarter turn.
The floor and half of the interior walls came from Jimmy, who also played a blinder. Cheers mate!
So do you want to see more of the workshop?
Labels:
electricity,
flourescent tubes,
tasklights,
turntable.
Saturday, 14 March 2009
OK... The workshop is (nearly) finished...
So, for the past few months I've been building the workshop so that I can carry on with the Lambretta rebuild. And I've reached the stage where I can move in, now. So this is what the workshop looks like from the outside...
As you can see, it needs a coat of paint, which I will do over Easter. It measures 16' by 8', and I built it myself from a big pile of wood. In total, the wood for the shed cost me about £1,200, but the ply is all exterior grade, and I treated all the timbers myself. I need to put a permanent roof on too, but for the moment it is weathertight.
The construction is double walled, which gave me space for the insulation, so the whole space is nice and warm and windproof. I was also lucky enough to get hold of some double glazed units (thanks, Hayley) which I fitted into the workshop. The original plan was to have a set of double doors to facilitate easy removal of scooters, but the single door is more than adequate, as it measures 1m x 2m... More than wide enough for even the fattest of Vespas!
Friday, 27 February 2009
Subscribe to:
Posts (Atom)